

Are you planning to permanently delete your Evernote Account? Evernote is one of the finest note-taking Apps for iPad. With so many suitable alternatives like Notion, Bear, Google Keep, or OneNote, you may be planning to switch to any of these from Evernote. See, deactivating an account and deleting an account are different things to consider. Deactivating an account is not a permanent thing. It can be activated again. To permanently delete an Evernote account, you need to delete the account.
A closer look into deletion and deactivation
Simply closing the account or stopping the payment will never delete the data in your Evernote account. It will delete none of your financial information. The cloud server of Evernote will still be holding the recordings, images, and notes. In short, every data within the Evernote account will remain there on the server.
Why is it necessary to delete the Evernote account permanently?
Unless you delete your Evernote account permanently, certain information and data will remain stored in the account. These are your account info like name, payment details, passwords, address, phone number, etc. Next, you will also notice that your confidential data, sensitive images, intellectual properties, and other notes are still available in Evernote Cloud. Hence, it is important to delete the account permanently to prevent any kind of data breach.
How to permanently delete your Evernote account?
So, you have finally set up your mind on deleting the Evernote account permanently. Have a look at the step by step procedure:
First step
Are there any notebooks from Evernote shared with you? If so, leave those shared notebooks. To do that, you need to visit the SHARED section of the notebook. If you are using Evernote in a web browser, simply click on the SHARED Notebook and open it. Then, click on the ELLIPSIS options menu. From there, click on the LEAVE Notebook. If you are using the app version, simply right click on the Share Notebook and then click Leave Notebook.
Second step
Deleting the notebook is not difficult. Simply right-click on the Notebook and then select Delete Notebook. When using the web app, you will find the DELETE from the ELLIPSIS options menu. This will result in not only moving the notebook but all of the notes into the trash. You can do this for all of the notebooks unless the list is emptied.
Third step
Emptying the trash is equally necessary. If you are using the desktop app, simply reach to the TRASH and right-click. There will be some options visible. From there, select the EMPTY TRASH. If you are using the web version, open the trash page. From there, go to options and select EMPTY TRASH. This is necessary to erase all your notebooks and notes. But remember, you will not be able to retrieve those files once deleted from the trash. Therefore, it is always recommended to take a proper backup of the notebook data before deleting the Evernote account.
Fourth step
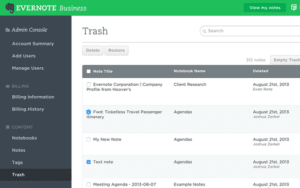
You need to clean the business trash. This is a step intended for those admins holding a business account with Evernote. In such cases, it is necessary to delete every single company note to avoid a data breach. Make sure permanent deletion happens. To make it happen, you simply need to open the admin console and then click on the TRASH. You will notice checkboxes beside all the notebooks and notes. Check only those boxes for the notes that you want to delete. Once done, click on the DELETE button and then hit the CONFIRM for complete data deletion. It will result in the permanent deletion of the selected notes from the present account and every other user account that it may have access to.
Deactivating Evernote permanently
It is recommended that you go for deactivation only after deleting all the notes and information from the Evernote account. The process is simple.
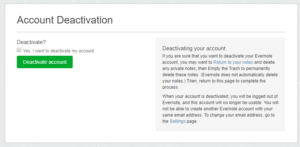
First of all, visit the Account deactivation page. It is crucial to ensure that you are being logged into the correct account. On this page, you will find an option DEACTIVATE ACCOUNT. Click on the checkbox beside the option. But keep in mind: this action is irreversible. Once done, it will shut your account permanently. The same email id that you have used for opening the account will become obsolete in case you want to reopen the account in the future.
Once the deactivation is commenced, your entire job is done.
Backing up the important data
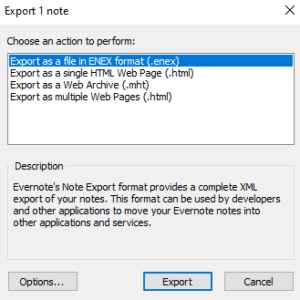
As mentioned earlier, you must back up all your important data and information before deleting the Evernote account. You need to have the desktop app installed. From the app, you need to click on FILE and select EXPORT. There will be a pop-up screen reflecting some choices on the file formats. Select the file format that you want to export.